21 February, 2024
Laravel Homestead – MongoDB not starting up
I recently had to work on an old Laravel project using MongoDB. Laravel Homestead is a great development environment solution that supports it out of the box. I didn’t expect any issues – it worked just fine previous time I worked on that project. I got the latest version of Homestead, upgraded vagrant box and to my surprise the provisioning failed. On my second attempt I disabled Mongo and it worked just fine. Uh oh!
I spent quite some time looking for a solution. To my surprise there was nothing recent or solid. I started debugging it and I found out the server was unable to start and produced no logs!
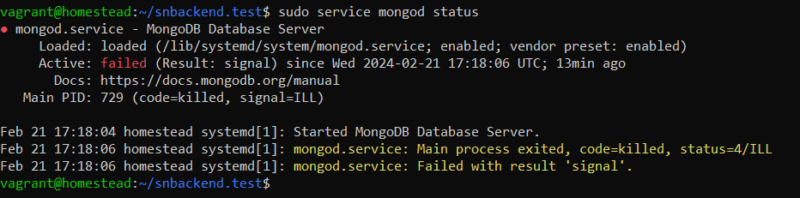
sudo service mongod status
● mongod.service - MongoDB Database Server
     Loaded: loaded (/lib/systemd/system/mongod.service; enabled; vendor preset: enabled)
     Active: failed (Result: signal) since Wed 2024-02-21 17:18:06 UTC; 13min ago
       Docs: https://docs.mongodb.org/manual
   Main PID: 729 (code=killed, signal=ILL)

Feb 21 17:18:04 homestead systemd[1]: Started MongoDB Database Server.
Feb 21 17:18:06 homestead systemd[1]: mongod.service: Main process exited, code=killed, status=4/ILL
Feb 21 17:18:06 homestead systemd[1]: mongod.service: Failed with result 'signal'.
Interesting, right? The signal=ILL part suggests that the CPU tried to process an invalid instruction. This made my search way easier. Turns out that recent Mongo versions require very specific set of CPU instructions, which collide with Windows virtualization.
AVX – the set of instructions required by MongoDB – is conflicting with Hyper-V, Windows virtualization solution. It might be enabled on your system, especially if you’re using WSL.
Run command prompt / Power Shell as an administrator and issue the commands below to disable Hyper-V:
bcdedit /set hypervisorlaunchtype off
DISM /Online /Disable-Feature:Microsoft-Hyper-V
Restart your system to apply the changes.
If you have Mongo installed on your Homestead and the provisioning (or manual install via /vagrant/scripts/features/mongodb.sh) failed – you might be missing the homestead user. You can add it by issuing the command below:
mongosh admin --eval "db.createUser({user:'homestead',pwd:'secret',roles:['root']})"That’s it! Have fun.