Category Archives: Notes to myself

PowerShell – modifying Task Scheduler trigger

Here’s a small code snippet I wrote for modifying triggers of a specific task – I needed to add a delay for all of them.

$task = Get-ScheduledTask -TaskName "Start TeamCity"
	
foreach($trigger in $task.Triggers) {
	$trigger.Delay = "PT5M"
}
	
Set-ScheduledTask -InputObject $task

That’s it!

Zabbix

Zabbix is a very flexible infrastructure monitoring tool. Full manual is available here.

The central component of Zabbix is the server. You can find the installation instructions for Zabbix 6 on Ubuntu 22.04 LTS is available here, alternatively you can grab a pre-set up image from the download page.

The second crucial component of the Zabbix system is the Agent that provides the easiest and most flexible way for monitoring the servers. When downloading it, always use the latest version – agent2 in this case.

The configuration for Zabbix Agent is stored at /etc/zabbix/zabbix_agent2.conf

The minimal configuration for an Agent is as follows:

Server=127.0.0.1
ListenPort=10050
Hostname=apache

As you can probably guess, we configure the Zabbix server address, port, and client hostname. After the basics are configured, let’s enable the agent auto-start and make sure it picks up the config changes:

systemctl enable zabbix-agent2
systemctl restart zabbix-agent2

When that’s done, the agent is ready to be added via Zabbix GUI or auto-discovery (we’ll talk about it later).

The Hosts screen in Zabbix GUI allows you to:

  • Monitor dozens of items at the same time – server load, RAM usage, service health (reference)
  • Set up triggers for certain events (eg. /etc/paswd being modified), which can be used for notifications
  • Set up graphs for visualising your data
  • Manage discovery features (hardware – disks, partitions, network interfaces, software)

Templates in Zabbix vocabulary are pre-configured sets of features that are great for specific needs. Out of the box you can get fully-featured monitoring package for things like web servers, SSL certificates or other common use cases. Bear in mind that templates can contain conflicting item names, which could prevent you from using specific templates in some cases.

Monitoring custom scripts is relatively easy. Note that scripts are executed by the same user that handles Zabbix agent – usually that user is simply zabbix. After you create the script you want to monitor, edit the Agent config (/etc/zabbix/zabbix_agent2.conf) and define it at the bottom, following the pattern below:

UserParameter=apache_config_test, apachectl configtest
UserParameter=apache_status, systemctl status apache2.service | grep active

Remember to restart the Aagent with systemctl restart zabbix-agent2. Rest of the work is done via GUI in Hosts -> Items -> Create item. Just input the self-defined item name in the Key field, so Zabbix can pick it up.

No monitoring is serving it’s purpose without proper alerts in place. This is where Triggers come in. They usually come bundled with Templates, which makes them globally accessible. You can configure your own triggers easily, all the expected features are in place.

Notifications require some setup to work effectively. First step would be configuring the notification media. You can do that at Administration -> Media Types, where you can configure pre-defined media like Slack, Jira, Discord, SMS and many others. You can also define your own media types.

Second step is to visit Administration -> Users and configure user’s mediums – you need to set the email address, phone number and such.

Last step is customizing the trigger parameters at Configuration -> Actions -> Trigger.

Agent-less monitoring is exactly what the name says. You can monitor servers without agent installed. This limits the usefullnes of this feature, since we are limited mostly to monitoring services on open ports. We can use agent-less monitoring to check ping, SSL certificates, HTTP, TCP availability, HTTP APIs etc.

Automating host discovery is something very useful in production environment, especially where you auto-scale your infrastructure. Check it out at Configuration -> Actions -> Autoregistration actions. An example would be to accept all hosts with “Host meta data” value to set something specific (Like “webserver”), where you define two Operations:

  • Add host – to simply link it to Zabbix
  • Link to template – to attach specific monitoring package to given machine

Make sure you install and configure the Agent when you provision the new machine. The minimal per-server changes to zabbix_agent2.conf would be:

ServerActive=5.5.5.5 # Server IP
HostMetadata=webserver

As always, make sure to restart the Agent after making any config changes.

Discovering network services is something not very useful in my use cases. It can be used to scan network IP ranges for available services, like FTP, SSH, HTTP etc.
Terraform

Terraform is a web infrastructure orchestrator. We started using it at Unknown Worlds recently, and it seems like The Way of handling deployment of complex infrastructure.

Here are the basic components of the dev cycle:

  • Infrastructure specification using HashiCorp Configuration Language
  • API calls to the provider (AWS, GCP, Azure etc)
  • Provisioning – managing the software and environment on provided infrastructure
  • Saving the state of the infrastructure. This is what makes the “cycle” possible – you can iterate on your scripts, and Terraform will remember the previous state of the infrastructure in a state file

Documentation URL: https://developer.hashicorp.com/terraform
You can find Terraform CLI install instructions here: https://developer.hashicorp.com/terraform/tutorials/aws-get-started/install-cli
You might also want to install AWS CLI: https://docs.aws.amazon.com/cli/latest/userguide/getting-started-install.html

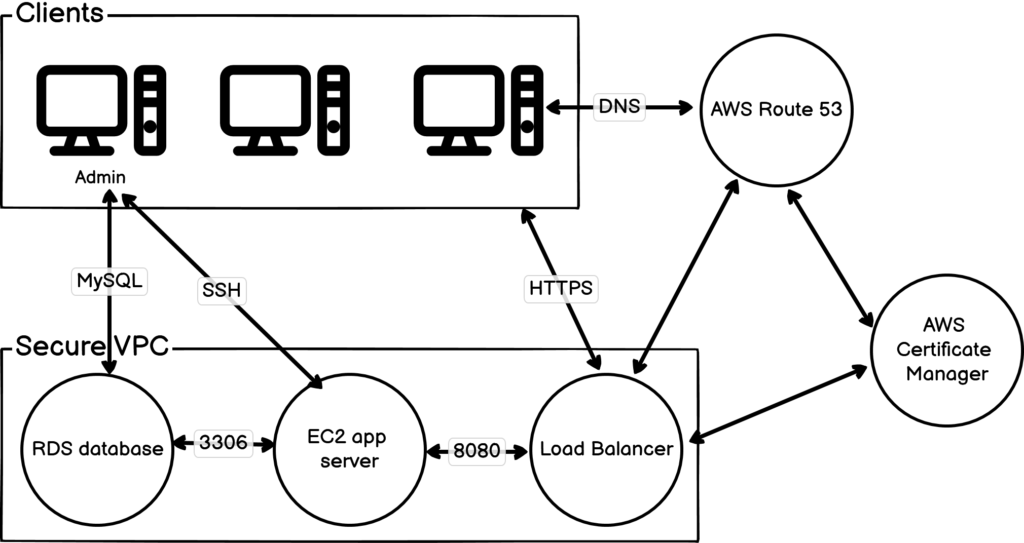
Here’s an example of an AWS-hosted infrastructure that could host a website, WordPress or something like it:

Terraform’s the tool to make it work quickly! Each element can be described in a great detail, the dependencies and relations are possible to describe in a clean way, and Terraform should be able to validate it all.

Basic commands:

  • terraform init is used to initialize Terraform and download all dependencies
  • terraform plan is used to verify the access credentials and validate steps
  • terraform apply is used to apply the changes to target environment
  • terraform fmt . is used to format code
  • terraform destroy can be used to easily delete non-production environments. Production environments should be protected about this! See https://developer.hashicorp.com/terraform/cli/commands/destroy

Here are some random notes:


Linux Shell Scripting Cookbook

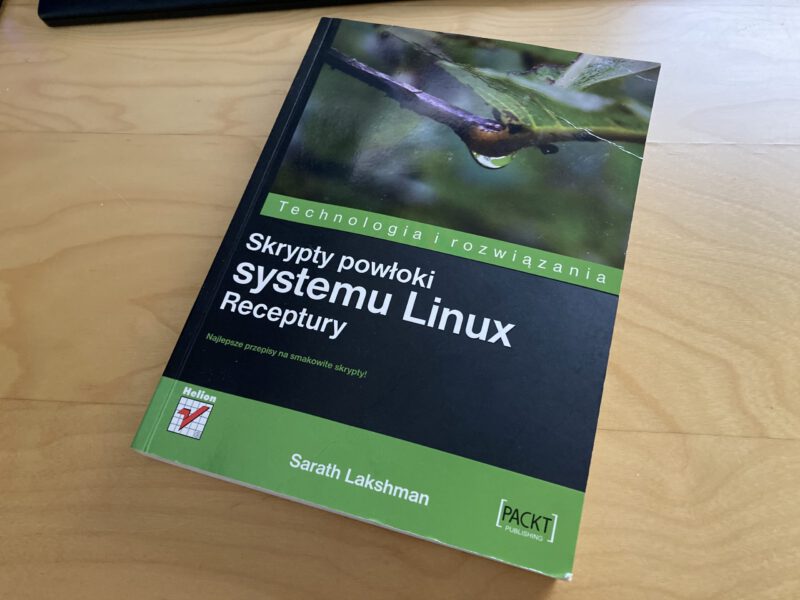
My book Pile of Shame became my tormentor. Recently I’m catching up with it just to get some closure. Most recent book I’ve read was waiting for over 10 years. Shame! I always had something better to read…

Linux Shell Scripting Cookbook by Sarath Lakshman is exactly what the title says. The book presents quite a few useful recipes to common problems. On top of that we’ll find some bash scripting basics and introduction to other common concepts.

I didn’t find much new stuff in it, but that was to be expected. Sadly, the way the book was written is pretty frustrating. One third of it are useless, repetitive descriptions and introductions. When you get over it, it might be a pretty decent read.

Here are some highlights of commands I’m not using often enough, for my own reference:

  • xargs
  • diff/patch
  • tree
  • grep (xD)
  • got to start using curl instead of wget
  • netstat
  • time
  • watch

Think like a game designer

Charlie Cleveland recommended this read to the UW team. I wasn’t ever interested in game design, so I decided to finally change that and check out the book. Justin Gary’s work has a subtitle “the step-by-step guide to unlocking your creative potential”. I never had any great game ideas, so I doubted that.

After reading it I had to admit that I was surprised. Gary’s systematic apporach to design seems like a no-nonsense approach that could produce game ideas that could be easily verified. I wish I had time to verify that, haha.

Contents, for future reference:

Part I Understanding Design 19
Chapter 1 Learning Fundamentals 21
Chapter 2 Getting Started 25
Chapter 3 Overcoming Obstacles 35

Part II Learning the Core Design Loop 39
Chapter 4 The Steps of the Core Design Loop 41
Chapter 5 Inspiring 43
Chapter 6 Framing 53
Chapter 7 Brainstorming 59
Chapter 8 Prototyping 69
Chapter 9 Testing 77
Chapter 10 Iterating 85

Part III Refining Your Designs 91
Chapter 11 The Phases of Design 93
Chapter 12 Engine Design 101
Chapter 13 Engine Development 113
Chapter 14 Component Design 119
Chapter 15 Component Development 125
Chapter 16 Polish 131

Part IV Building Great Games 143
Chapter 17 What Makes Games Great? 145
Chapter 18 Elegance 147
Chapter 19 Excitement 155
Chapter 20 Depth 161
Chapter 21 Motivation 169
Chapter 22 Engagement 177

Part V Making Money 185
Chapter 23 Monetizing Games 187
Chapter 24 How to Be a Professional Game Designer 193
Chapter 25 How Can I Get My Game Published? 197
Chapter 26 Game Business Models 203
Chapter 27 How to Make Games That Last 211
A Final Note: Living the Lessons 217

Raspbian Stretch, WiFi and TP-Link TL-WN725N

Few weeks ago I had to install fresh Raspbian on my old Raspberry Pi 2B. Everything was way smoother than few years ago, when I bought it. The only annoying issue I had was getting the WiFi to work properly. My TP-Link card (TL-WN725N) had it’s diode indicating that it’s operational, but Raspbian couldn’t find any networks.  I saw the OS recognizing the card, and after scanning for SSIDs, I saw my network. It was pretty weird – Raspbian still wouldn’t connect to them. After few hours of googling and trying few solutions, I found two sources with tips that helped me.  Here they are:

Reference #1

Reference #2

Plastic SCM and binlog issues

Plastic server in our company is backed up in several ways. One of them is MySQL replication, simple master -> slave setup. One day the error above (logging format issues) popped up. Thankfully, the fix was pretty simple, but it took some time to find it.

Firstly, you need to stop the MySQL slave. Execute “STOP SLAVE;” command in MySQL console to do it.

Secondly, run the commands below on the master’s MySQL console:

FLUSH TABLES WITH READ LOCK;
FLUSH LOGS;
SET GLOBAL binlog_format = 'MIXED';
FLUSH LOGS;
UNLOCK TABLES;

Remember to set the binlog format in the master’s config file!

The last step is to start the slave replication. That’s it!

Jenkins, SSL, and cPanel

Straight to the point. The basic idea is to hide Jenkins behind an Apache reverse proxy. I’m using cPanel on CentOS – and cPanel doesn’t like fiddling with httpd.conf. You’ll find lines like this in it:

# To customize this VirtualHost use an include file at the following location
# Include "/usr/local/apache/conf/userdata/std/2_4/user/domain.com/*.conf"

I created two config files – I want to set up proxy and redirect non-HTTPS requests to HTTPS:

"/usr/local/apache/conf/userdata/ssl/2_4/user/domain.com/ssl.conf":
ProxyRequests     Off
ProxyPreserveHost On
AllowEncodedSlashes NoDecode

<Proxy *>
 Order deny,allow
 Allow from all
</Proxy>

ProxyPass         /  http://localhost:8080/ nocanon
ProxyPassReverse  /  http://localhost:8080/

RequestHeader set X-Forwarded-Proto "https"
RequestHeader set X-Forwarded-Port "443"
"/usr/local/apache/conf/userdata/std/2_4/user/domain.com/redirect.conf"
RewriteCond %{REQUEST_URI} !^/.well-known
RewriteRule (.*) https://jenkins.domain.com/$1 [R=301,L]

After that, run commands to refresh the configs and restart Apache:

$ /usr/local/cpanel/bin/apache_conf_distiller --update
$ /usr/local/cpanel/bin/build_apache_conf
$ service httpd restart

And we’re done!

UPDATE – iptables rule to block port 8080 traffic outside of localhost:

iptables -A INPUT -p tcp --dport 8080 -s localhost -j ACCEPT
iptables -A INPUT -p tcp --dport 8080 -j DROP

Laravel, laravel-mongodb, Laravel Forge, and PHP 7

Oookay, so for some reason the mix from the title was a big deal. When you try to install laravel-mongodb package on servers created by Laravel Homestead or Forge – it’s going to fail. To be specific, when you try to run:

composer require jenssegers/mongodb

composer is going to start bitching about missing mongodb php extension. And you can’t install it until you run:

sudo apt-get install libcurl4-openssl-dev

Then you’ll be good to go. Install the new mongodb extension by running:

sudo pecl install mongodb

and then add the following line to your php.ini file (probably /etc/php/7.0/cli/php.ini & /etc/php/7.0/fpm/php.ini):

extension=mongodb.so

That should be it. Don’t forget to restart nginx.

Importing Postgresql dump

sudo -u postgres pg_restore --verbose --clean --no-acl --no-owner -h localhost -U postgres -d dbname ./dumpfilename